how-to
Interac e-Transfer Autodeposit
How to setup and manage Interac e-Transfer Autodeposit in Online Banking

Receive Funds Faster with Autodeposit
Have the money sent through Interac e-Transfer automatically deposited into your Libro account, with no password to remember or mistype.
- Enjoy the added security and ease of Autodeposit
- Manage and update your settings whenever you want
- Spend your time doing better things than waiting for an incoming transfer
How to Manage Interac e-Transfer Autodeposit
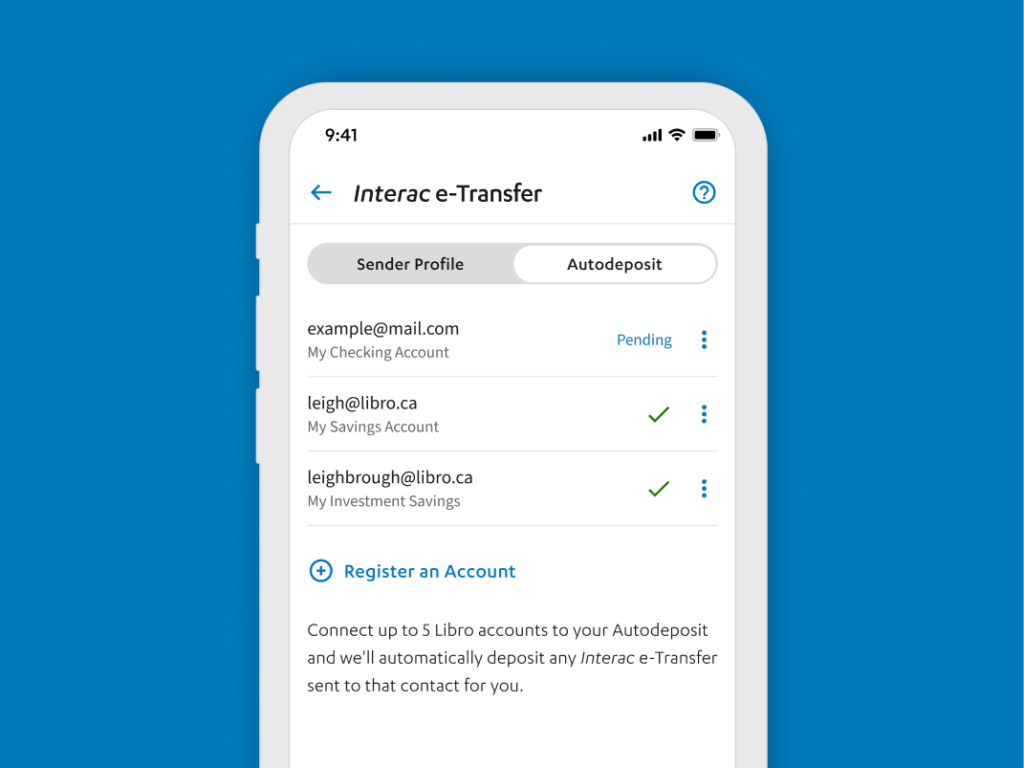
Setup Autodeposit
To get started, follow the steps below:
- Sign into Online Banking.
- Select “Interac e-Transfer’ in the main menu.
- At the top of the page click the three little dots ︙ and click ‘Auto Deposit Settings’ and ‘Interac e-Transfer’.
- Click ‘Register an Account’
- Select the contact method you want to register Autodeposit for: ‘Email’ or ‘Mobile’.
- Input the email or mobile phone number you want to connect your account to.
- Select the account you want the money deposited into.
- Select ‘Register’.
- A message will be sent to the contact method you chose. Open your email inbox or text messages and follow the instructions to complete your registration process.
- Note: the link will expire in 24 hours.
Note: You can register up to five different contact methods to five different accounts. However, once a contact method is registered for the feature, it can’t be used again with another account. Simply click the blue ‘+’ button and follow the steps above again for a different contact method.
Change Autodeposit
- Sign into Online Banking.
- Select “Interac e-Transfer’ in the main menu.
- At the top of the page click the three little dots ︙and click ‘Auto Deposit Settings’ and ‘Interac e-Transfer’.
- Toggle to ‘Autodeposit’.
- Click on the three little dots beside email or mobile phone number you want to edit.
- Click ‘Edit’.
- Make the desired changes to the contact method and account.
- Click ‘Save’.
Remove Autodeposit
- Sign into Online Banking.
- Select “Interac e-Transfer’ in the left-hand main menu.
- At the top of the page click the three little dots ︙and click ‘Auto Deposit Settings’ and ‘Interac e-Transfer’.
- Toggle to ‘Autodeposit’.
- Click on the email or mobile phone number you want to remove.
- Click ‘Delete’ and ‘Remove’.
Have questions or need assistance? A Libro Coach is happy to support, reach out anytime.
Frequently Asked Questions
Is Autodeposit secure?
Yes, the Autodeposit feature of Interac e-Transfer has the same bank-grade security as is standard with the Interac e-Transfer service. Interac e-Transfer is one of the safest digital money transfer services in the world. When you send or request money using Interac e-Transfer, the money is transferred through the established and secure banking procedures that financial institutions have used for years to settle cheques, bank machine deposits and withdrawals. Money never travels by email or text – these are simply used to notify you that money was sent or requested, as well as provide instructions to complete the deposit or request
Once I register for the Autodeposit feature, how will I know when someone sends me money?
Each time you receive funds through the Autodeposit feature, a notification will be sent to you by email or mobile phone letting you know that money has been deposited into your bank account.
How many contact methods can I register for the Autodeposit feature?
You can register up to five different contact methods to five different accounts. However, once an email or phone number is registered for the feature, it can’t be used again with another account.
For instance, if you register your personal Gmail account with your Premium Chequing account, you cannot then register that same email address at Libro (or any other Financial Institution) to be associated with another account. The logic is fairly simple, as Interac would be conflicted as to which account to deposit the money.